|
|
 A club open to anyone who owns a Piper-built boat |

|
|---|---|---|
|
|
A club open to anyone who owns a Piper-built boat |
|
|---|---|---|
|
KATHE II – THE BIRTH OF A PIPER BARGE – PART 2 First published in Pipeline - Autumn 2008 Since the first article was published in the summer edition of Pipeline, the boat has progressed from an incomplete shell to a partially fitted out barge that is beginning to look as if it has the makings of a future home. This article will attempt to explain the various steps to how we arrived at the present stage from what was an incomplete set of steel ribs and profiled plates when Part 1 was written in April.
Following various discussions with Simon, Kath & I have spent many interesting hours developing the internal layout drawing and modifying our specification sheets so that there would be less likelihood of any misunderstandings and/or acrimonious debates later on. The internal layout required us to consider what facilities we would need to live on board that we didn’t have (or need) on our narrowboat that was intended for leisure & pleasure only - eg where do you store the ironing board, washing basket etc? These types of domestic considerations threw up many interesting challenges and now we also had to consider the needs of a 10year old grandson who lives with us – more of which later. The intention was to create a layout that did not give the impression of being cramped, was light, airy and could accommodate some visitors - for an extended period if necessary.
Close to the completion of the hull fabrication, I was asked to attend an extended meeting at Piper Boats to finalise all of our requirements regarding equipment, and the practicalities of our proposed layout, to ensure that all the electrical and plumbing runs could be accommodated and more importantly the maintainability of the various systems was not compromised. This meeting involved making decisions that would be binding as equipment needed to be ordered so that the build could continue uninterrupted but it is difficult to make an informed decision or choice when you do not have any direct experience with some of the equipment involved. However, rightly or wrongly, we muddled through and only time will tell if our decisions were correct.
To satisfy this requirement we have chosen mains powered units, and yes I can hear some people saying that this is wrong on a boat but good quality domestic mains powered units are usually more reliable, durable and more energy efficient – even allowing for inverter losses. This decision meant that we had to decide which units required power from the inverter(s) and which needed the larger diesel generator capacity. One other deviation from our original thoughts was to include a fan assisted electric twin oven rather than a gas oven but we would retain the gas hob. The final result was that we ended up with two inverters so arranged to allow us to manually changeover from the main inverter to the standby unit that would then supply only the fridge and freezer in the event of the main inverter failing. The fridge and freezer are the only two domestic appliances that need 230Vac power 24/7 (hence the standby) but the washer-dryer (in drying mode) and the electric ovens would be powered from the generator, the dishwasher and washer-dryer (in washing mode) could easily be powered from the large inverter especially when cruising. There will be sufficient additional power available from the generator to charge the batteries whilst moored even when it is powering either the dryer or ovens.
The fabrication of the shell was not without some minor problems but the final result was well worth all the debates and alterations as the finished product looks well proportioned and we are pleased with the overall appearance – although, I admit, good looks are a subjective opinion. Simon had done his usual trick of adding technical improvements based upon cruising experiences with his own boat LAGOM whilst cruising in France. We have now ended up with six sets of bollards (5 doubles and 1 single) along each side of the boat that should allow us to tie-up easily irrespective of the spacing of the shore bollards or rings and the bollards also provide good points from which to hang fenders and to tie ‘springs’. Following some late discussions with Simon we also opted to dispense with the rear doors of the wheelhouse which has allowed us to have a full ‘dinette’ style area in the wheel house that will make up to a king size + double bed when we need overspill space for friends - who’s numbers seem to have rapidly increased since the start of this project. The double glazing and CH radiator in the wheelhouse should also assist in making any sleep-over here quite snug. The completed shell was transferred from steelwork fabrication to the fitting-out bay in mid-July and this stage represents a major milestone for any new boat owner as you can begin to see outwardly how the finished boat is likely to look. One early modification that we made to the originally designed profile was to have the long cabin roof made as a single sweep rather than with a step down towards the forward end. We believed that this modification would improve the appearance of the outline as you end up with a single flowing curve from the wheelhouse to the cabin end at the bow and more internal headroom. A higher than usual deck level also means that stepping up onto the roof at the forward end is easily achieved without steps – roof access being necessary for raising & lowering the ‘mast’, fitting the stove chimney and cleaning the three roof hatches.
The Beta 120 engine arrived at the beginning of August and was duly fitted into the engine bay, but not without some choice words as this was a big lump to manoeuvre through a limited opening. The keel cooled engine-gearbox combination weighs in at a hefty 670kg and the keel cooling tank for this engine holds approx. 250 litres of coolant. The engine room looked quite spacious until most of the light was blotted out by this unit. Ballast for the boat was another issue for Simon and his team to ponder over. They decided that a large boat such as this required about 12-tonnes of ballast to ensure that it will sit down in the water such that it can achieve the designed air draft to avoid the many low bridges on the River Soar, Beeston Cut, Nottingham canal and the T&M canal as far as Burton-on-Trent. As the final result of Simon’s decisions will only become evident when the boat is floated it was decided not to fit carpets until after the boat was in the water and, if needed, any trim ballast had been added. This brought the construction to the installation stage of the floor, underfloor plumbing and insulation that was fairly straightforward. I specified 40mm thick sprayfoam insulation all around in an attempt to minimise heat losses as I hate to see ‘money’ permeating through the hull to heat the outside atmosphere. Once the floor was installed the true size of the inside ‘cavern’ was apparent – it looked very big as the photo indicates. The 1300-litre stainless steel fresh water tank was installed in a frame that is positioned below the double berth in the master bedroom and it too has been sprayfoam insulated to prevent condensation forming on the outside when it is refilled with cold water in the winter and the surrounding air is relatively warm. The tank also sits on a layer of polystyrene sheet.
At the time of writing this article we have reached an initial stage of fit-out but the build will have progressed significantly further on when the Autumn Pipeline is published, leading to an even more advanced stage when we host an open day one Saturday in September when any interested PBOC members and friends are invited to Piper Boats at Biddulph to view the progress. The date for the open day will be posted on the PBOC website and refreshments will be provided. The next article will cover the final fit-out stages, the launch and commissioning at Newark-on-Trent (expected in October) and the journey back to our mooring at Barrow-upon-Soar. By Peter Fairhurst Return to Pipeline Index Back to Part 1 Continue to Part 3 |
 As
I wrote in the first article, our house was up for sale (Plan A) but
unfortunately the state of the UK housing market is such that it proved
impossible to sell the property in a realistic time and so Plan B had to be
enacted in order for the boat build to continue to completion; suffice it to say
that in the words of the Snow White song ‘I owe, I owe so off to work I go’
(with apologies to dear Walt).
As
I wrote in the first article, our house was up for sale (Plan A) but
unfortunately the state of the UK housing market is such that it proved
impossible to sell the property in a realistic time and so Plan B had to be
enacted in order for the boat build to continue to completion; suffice it to say
that in the words of the Snow White song ‘I owe, I owe so off to work I go’
(with apologies to dear Walt). 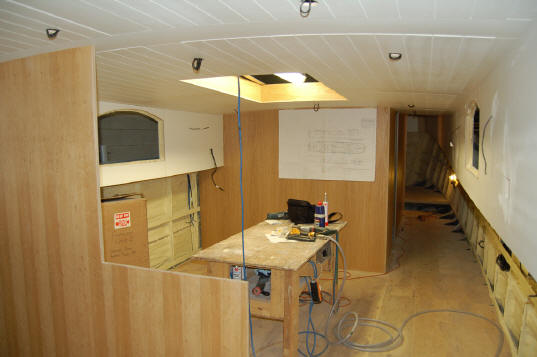 The
final configuration (starting from the bow) is a master bedroom, shower
room/toilet, guest (grandson) cabin with en-suite, saloon, full-width galley and
a wheelhouse that will be used as the main dining area. All these areas are
reasonably sized and yes you can swing the proverbial cat around. The inclusion
of our grandson (Jake) was not originally part of the ‘Plan’ but needs must and
we had to adapt the accommodation. This now meant providing somewhere to do his
school homework (in peace) and also some personal space where he could watch his
TV and use his Play Station. To create some privacy we designed a small en-suite
room with toilet and wash basin and his cabin also contains a wide single berth,
wardrobe, a set of drawers and a pull-out desk top.
The
final configuration (starting from the bow) is a master bedroom, shower
room/toilet, guest (grandson) cabin with en-suite, saloon, full-width galley and
a wheelhouse that will be used as the main dining area. All these areas are
reasonably sized and yes you can swing the proverbial cat around. The inclusion
of our grandson (Jake) was not originally part of the ‘Plan’ but needs must and
we had to adapt the accommodation. This now meant providing somewhere to do his
school homework (in peace) and also some personal space where he could watch his
TV and use his Play Station. To create some privacy we designed a small en-suite
room with toilet and wash basin and his cabin also contains a wide single berth,
wardrobe, a set of drawers and a pull-out desk top. 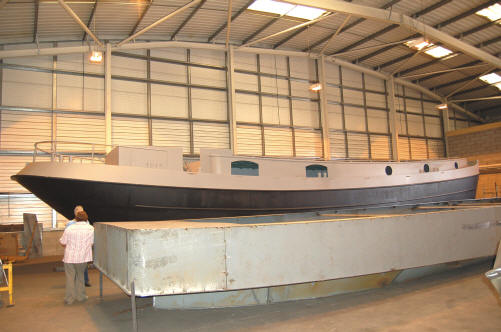 Kath
& I had elected to supply all the ‘white goods’ for the galley as we wanted
specific makes that we believed would provide a long trouble free service life,
had good energy efficiency ratings and had a low noise level when working. As
the saloon could also be used to accommodate sleep-over guests it is important
that, in an open-plan saloon-galley layout, items such as the fridge and freezer
should operate as quietly as possible.
Kath
& I had elected to supply all the ‘white goods’ for the galley as we wanted
specific makes that we believed would provide a long trouble free service life,
had good energy efficiency ratings and had a low noise level when working. As
the saloon could also be used to accommodate sleep-over guests it is important
that, in an open-plan saloon-galley layout, items such as the fridge and freezer
should operate as quietly as possible.  For
the first few years (until retirement) the boat is likely to be moored up more
than it is cruising and as we have a shore power connection the use of our
generator should be minimal.
For
the first few years (until retirement) the boat is likely to be moored up more
than it is cruising and as we have a shore power connection the use of our
generator should be minimal.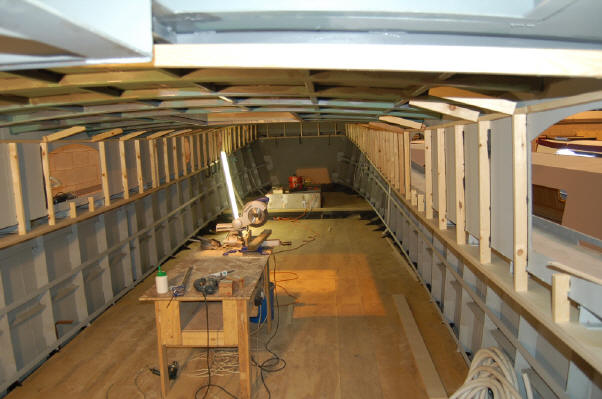 Another
modification that we made was an equipment locker where the fresh water tank
would normally be located in the bow. For reasons that I outlined in the first
article we decided to have a stainless steel water tank and this decision freed
up a fair volume of space in the bow that will now be used for the storage of
ropes, folding chairs, fenders etc. Some of this space is occupied by the anchor
chain locker and anchor chain hawse pipe (one for the Pipeline quiz) but there
is still a usable amount of room and it is illuminated by bulkhead lights.
Another
modification that we made was an equipment locker where the fresh water tank
would normally be located in the bow. For reasons that I outlined in the first
article we decided to have a stainless steel water tank and this decision freed
up a fair volume of space in the bow that will now be used for the storage of
ropes, folding chairs, fenders etc. Some of this space is occupied by the anchor
chain locker and anchor chain hawse pipe (one for the Pipeline quiz) but there
is still a usable amount of room and it is illuminated by bulkhead lights.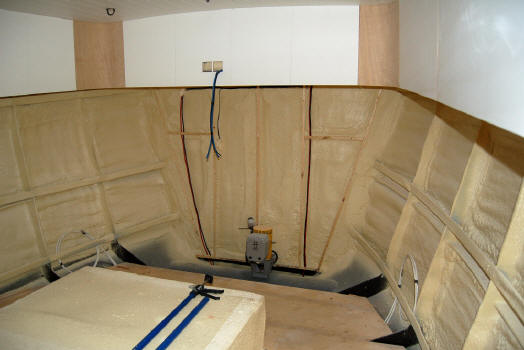 We
were now at the lining out and bulkhead fitting stage but before this commenced
it had to be decided where all the electrics were to be located as the cables
needed to be in position before they were finally covered. This was not easy to
decide as we had to be sure where we were required to permanently locate
electrical equipment, lights, switches, sockets etc and (again) we had decided
to supply all the electrical fittings to ensure that they were fully integrated
from one manufacturer. We chose to use the MK Chroma Plus range of electrical
fittings where they were visible as we had previously used these in our
narrowboat but where fittings were hidden from view we used the more economical
MK Logic range. We also decided to add an outdoor RCD protected, 13Amp socket to
allow us to use electrical equipment off the boat.
We
were now at the lining out and bulkhead fitting stage but before this commenced
it had to be decided where all the electrics were to be located as the cables
needed to be in position before they were finally covered. This was not easy to
decide as we had to be sure where we were required to permanently locate
electrical equipment, lights, switches, sockets etc and (again) we had decided
to supply all the electrical fittings to ensure that they were fully integrated
from one manufacturer. We chose to use the MK Chroma Plus range of electrical
fittings where they were visible as we had previously used these in our
narrowboat but where fittings were hidden from view we used the more economical
MK Logic range. We also decided to add an outdoor RCD protected, 13Amp socket to
allow us to use electrical equipment off the boat.